Latest Posts
Showing posts with label mains. Show all posts

{ Recipe } French-Style Cottage Pie


"It is this time of the year, everyone is craving for some kind of comfort food to keep them warm and cozy. While having a bowl of soup is definitely a must but sometimes another alternative can be quite appealing too."

This was written early June, I can't believe it took me almost four months to get to start write it again! Anyway, I have been quite busy the past few months. In early July, my precious little pear was born. Since then, I have been quite occupied with this little one. If you ask me how I feel to be a parent, I can honestly tell you, I enjoy more to be a mum now than the first three months. It was tough, but everything seems getting better and better. Little pear is now more fun to play with and she just melt my heart every single time she smile at me.

Back to the recipe, it might be a bit too warm to enjoy it now, but you can definitely keep this in mind for your next winter or a cool rainy day!

{ Recipe } Chicken Karaage


This is one of the best fried chickens that I really don't mind to cook at home. Simple yet tasty! Mr. Pear and I like to order this when we eat out in the Japanese restaurant.

Chicken karaage is best serve with beer. I am not saying that I am an alcoholic or trying to promote alcohol, but deep fried chicken of course is nicer to eat with beer and friends, especially at a game night or party of some sort.

Forget about the alcohol. This is sure a big hit on the dinner table for most of the kids! Com'on, who doesn't like deep fried food! If deep fried Mars bar can be a hit, why can't chicken karaage? It is sure healthier than the Mars bar. At least, I think so. :P

I can confirm you that the taste is excellent. However, you may ask if it is hard to make. The answer is NO! Unless you truly hate deep frying at home, otherwise, there is no reason for you not to give it a go. Enjoy!


{ Recipe } Chorizo & Broccoli Quiche


Early this year, our dear friend Nadyne came back from her six months business trip, so we decided to have meet up before she went on her next trip. Since two in our group have got kids, I thought meeting outside would be hard and we possibly won't have much time to catch up. Therefore, I was so brave to put my hand up and suggested to meet up for brunch at my place!

I have never cooked for seven adults plus three kids before. However, I do love being around with people. Well, it turned out not bad. Actually, I would say it was good! Considering, I have no experience at all :D So, that was a big proud moment for me when I put up the food on the table.

I always want to cook a nice breakfast / brunch to Mr. Pear and friends. This was the perfect time! A week before the brunch I tried to think about the menu and thought about if I could have enough time to prepare all the these that I wanted to cook. I was stressed, but a good one! I love the challenge! So, these were the dishes on the menu (clockwise):

  • Chorizo & broccoli quiche
  • Egg salad buns
  • Pancakes with blueberry compote
  • Curry chicken salad sandwiches


This is my first ever quiche from scratch. My first batch of the pastry was a disaster. I did not know what went wrong but the tart came out was ugly (but it still tasted good). So, I quickly did another batch and put it in the fridge and finished the rest in the next morning.

 The second batch was not looking great but it was so much better. I love the tart pastry, very crunchy! I will definitely make it again for weeknight dinner!


{ Recipe } Gyudon 牛丼


Ok, it might be new to you... something about me... I always have a thing for Japan. I love almost everything from Japan, be it animate, manga, craft, home decor, people, or the place itself.

However, among all, I love Japanese cuisine the most. Not hard to understand why. They are simple, fresh and delicious, plus most of the popular dishes are actually super easy to make than they look!

Remember the oyakodon? Cooking gyudon is just like cooking oyakodon. 5 main ingredients and ready in less than half an hour. It is definitely a weeknight winner, especially after a long day at work :))

{ Recipe } Cauli-Crust Pizza


Yes, you did not read it wrong! It is a pizza with a cauliflower as a base!! Seriously, I don't know about you but I personally haven't heard that before. When I first read the title of the recipe, I was like does it really work? So, I decided to try it the other night and it was a pleasant surprise! At least, both Mr. Pear and I love to go for another slice :D Com'on it is healthy, why not?

I found this awesome recipe from a new launch magazine -- taste.com.au magazine formerly known as Australian Good Taste magazine. I have bought their first and second issues. I tell you, I love every single recipe that they have in the magazine. Without hesitation, I decided to subscribe for the very first time with their e-magazine for a year :D

I told myself since I have subscribed, I have to make the effort to try at least one recipe from each issue, otherwise, I will just waste the money. I think it can somehow improve my cooking skill too :D

Anyway, get back to the pizza. Though the crust is not as strong as the flour one, it tastes absolutely amazing. Best of all, it is healthier :D The topping is up to your imagination! Why don't you go get something cauliflower and make this for dinner tonight?


   Cauli-Crust Pizza  
{ adapted via taste.com.au magazine issue 1, p.60 }
serves 4 | prep & cook 1 hr | Italian 

[ Ingredients ]

650 g piece caulifwer, trimmed, chopped
1 egg, lightly whisked
50 g (2/3 cup) finely grated parmesan
80 ml tomato paste (original use: passata)
60 g olives, pitted (original: Sicilian green olives, I am trying to clean my fridge, so I use whatever I had)
1 chorizo, sliced
10 fresh thyme sprigs (from my edible garden:D)

[ Method ]

1 Process the cauliflower in a food processor until finely chopped. Place chopped cauliflower in a microwave-safe bowl. Cover and microwave on high for 8-10 mins or until very tender. Drain through a fine sieve, pressing down well with a wooden spoon to remove excess liquid. Combine the cauliflower, egg and half the parmesan in a bowl.

point >> it depends on the power of your microwave, it took me about 20 mins to cook the cauliflower until very tender. Remember to drain as much water as you can, coz you don't want your pizza base too wet.


2 Preheat oven to 230C/ 210C fan forced. Line a 30cm-round pizza tray with baking paper. Press cauliflower mixture firmly into the tray. Bake for 20 mins or until golden.

before
after
3 Spread tomato paste over base and sprinkle with olives, chorizo, thyme and remaining parmesan. Bake for 7 mins or until chorizo is golden.


[ Kitchen Notes ]
  • My base was a bit wet. So next time I could either press harder to drain more water out or bake a bit longer to dry out a bit of the moisture. 
  • Like any other pizza, you can put whatever you like, but I would advise you to precook the ingredients first as the baking time is not very long.


♥  bon appétit :)


{ Recipe } Char Siu Pork Belly (BBQ Pork Belly)


Sorry for the lack of posts... Busy? No, I am not. If you didn't know, I have found a job in late June. This was when I kinda stopped posting.

My work is not hard nor busy, but the travelling time to and from work is just killing me. Everyday I go home, I feel exhausted and have no motivation to do anything except sitting on the couch and watching my favourite TV shows. Yes, I am that procrastinating...

I still cook occasionally when I feel like :D Thank God that I have Mr. Pear who loves to cook, otherwise, I could have been as skinny as a stick. Ha! Exaggeratd! Anyway, I am back!

Lianne from Food Made With Love actually encourages me with her "Be Bold" post. It's like a wake up call. If you don't know, I actually started blogging roughly around 1999. I created my own homepage via Geocities (I am very proud of myself, coz I know I can never do it again).

Somehow, I stopped and started again in 2004 with Blogger. Since then on and off for a couple of times and I have started quite a few blogs all these years. I think in life, if you really want to achieve something you should be really consistent and hold on to it.

Giving up half way is now forbidden! haha! Yes, it's time to be tough to myself! I have been too lenient to myself... If I want to do something I like and I enjoy, I should give it 100% and hold nothing back. hehe... sounds so serious!

If you haven't seen me for a while, please drop me a few lines or words to remind me you are still waiting for my posts! :D I will be really encouraged by your kind words.

Ok, back to the post! If you follow my facebook page (if you haven't, I strongly recommend you to like it, as I upload photos quite often on this page, so you won't miss out too much.), you should know I made this char siu some time ago and said I will post the recipe "soon". So here we go! I finally take the time to start writing again and this char siu post is the best to start the journey.

Who doesn't like char siu? To be honest, I haven't heard anyone said he/she doesn't like char siu. Seriously, if you do have a friend doesn't like it, you should make this one for them to try. Sure they will change their mind.

Char siu is one of the most popular dishes in many families in Hong Kong. I remember when I was young, mum always bought char siu when she did not know what to cook for dinner. I like mum to have a lazy night as I love char siu especially the charred one with the crunchy touch and a little bit of fat...ummm... YUM!

We still can buy char siu here in Brisbane, but it's so much different from those in Hong Kong. Plus here, char siu is luxury good = very expensive, thus I seldom buy for dinner even I don't feel like cooking! haha...

The other day when I was waiting for my flight to Sydney, I found this recipe in Feast by chance. That issue also introduced our famous unofficial Chinatown in Sunnybank. Love to see magazine talking about things around me, feel so familiar and close :)

So when I came back from Sydney, I decided to make this one night and Mr. Pear was so impressed and complained I did not make enough! Guest what I did? I gave him the magazine and told him to cook for himself if he wants more.... hehe, I am just me being me :PP

Anyway, you should give it a go, coz it is not hard to make at all! Have fun! :D

{ Recipe } Pork and Vegetable Dumplings with Garlic Vinegar


Dumplings, something like pizza. I know it is a bit weird to use pizza as an example, but seriously, you can have many different fillings, just like pizza has different toppings, right?

Another variation you can do with dumplings is how you cook them. You can pan fry, you can steam, you can deep fry or even boil them, depends on your personal preference. This time I chose to boil the dumpling and dipped with garlic vinegar.

This time I chose to use mince pork and Asian green (I used bok choy) as the main ingredients. I also put some dried shitake mushroom.

As for wrapping the dumpling, you can pick a method from my last post. The one I used is a bit complicated to explain but it is not too hard to make once you practise a few time. :D

{ Recipe } Taiwanese Beef Noodle Soup


Oh, Pinterest, Pinterest! I don't know how I can live without you. You are so awesome and you are so addictive!! Sometimes, I can spend the whole night just browsing Pinterest. This site has all I want to see, fashion, design, craft, photography, recipes.... countless! I discovered this recipe via Pinterest the other day. Since I have not found a job yet and I think I should be a good wife and cook more for my Mr. Pear :D, I decided to make this tonight.

Taiwanese beef noodle soup best comfort food for winter time and I am so glad that we bought the pressure cooker from Aldi (though not a fancy one, it does its job quite well!). If you follow the original recipe by using the slow cooker, it will take you about 6 hours. Whereas using the pressure cooker, your dinner will be ready in less than an hour! Both cookers are amazing, but I just find pressure cooker is more convenient. :D


   Taiwanese Beef Noodle Soup   
serves 4 | prep 10 mins | cook 40 mins | Taiwanese

[ Ingredients ]

600 g beef stew meat
4 cups water
1/4 cup dark soy sauce
1/4 cup light soy sauce
1/2 cup Chinese rice wine
1/8 cup rock sugar 冰糖
3 slices fresh ginger
2 stalks green onion, sliced
3 garlic cloves, minced
2 red hot chili, seeded
1 tbps all spice powder
1 cup chicken broth
1 pack Yang-chun noodles 陽春麵 (any dried Chinese noodles will do)

[ Method ]

The below is for reference only, for a proper full version of the recipe, please click here and to enlarge the image, please click the photo.


[ Kitchen Notes ]

¶ It is important to wash the noodles under running cold water, as it helps to prevent the noodles stick together and to prevent the noodles being overcooked with the heat of the noodles.

¶ As this dish does not have any veggie, so Mr. Pear made his homemade pickled veggie to make this dish more nutrient. What a thoughtful man!! :DD

  bon appétit  :)

{ Recipe } Sticky Baked Pork Ribs


This is a very simple dish from Christine's Recipes (she also has a Chinese version of this blog called 簡易食譜). She cooks many Chinese traditional food and the best of all is they are all simple and easy to do. When I found out she is also living in Brisbane, I was really happy. Why? Because whatever she bought for her cooking, I am sure I can find it here!!! hehe... Even I can't find, I can simply ask her :DDD

I have tried quite a few recipes from her and this is one of those. That night I cooked for Mr. Pear for dinner and put some fried pumpkin and snow peas for sides. Easy and quick fix for a lazy night or a lazy housewife, like me! :P I wish I can cook like her :))

Try this one night and you will love it!!


  Sticky Baked Pork Ribs  
serves 2-3 | prep 10 mins (plus marinate) | cooking 40 mins | Chinese

[ Ingredients ]

400 g American pork rib

Marinade

2 tbsp char siu sauce (Chinese barbeque sauce) 叉燒醬
1 tsp ground bean sauce 磨豉醬
2 tsp freshly grated ginger
3 tsp light soy sauce
1 tsp Shaoxing wine
2-3 tbsp water

[ Method ]

Note: the below is for reference only, for a proper full version of the recipe, please click here and click photo to enlarge.


[ Kitchen Notes ]

¶ Since I have no chau siu sauce, I replaced it with hoisin sauce 海鮮醬. It still tasted very nice :D

¶  I obviously did not read the tips from Christine and that's why my sauce was dried up!! haha~ Therefore, it is very important for you to read through the recipe! ;)

  bon appétit  :)

{ Recipe } Oyakodon 親子丼


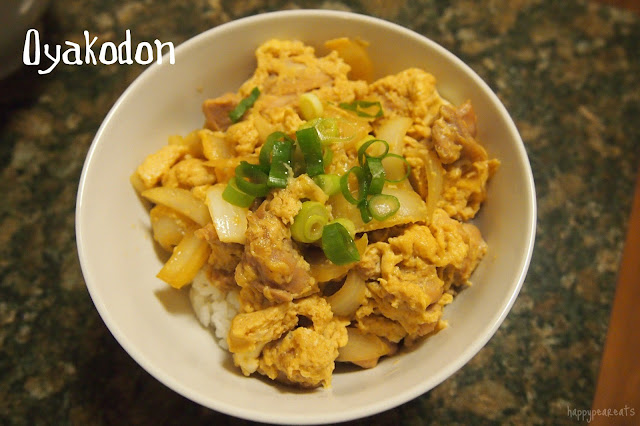
I love Japanese food. Oyakodon (親子丼) is one of my all time favourite Japanese dish. It literally means parent and children rice. This is simply because this dish main ingredients are chicken (the parent) and egg (the children). What a meaningful dish! But at the same time, it sounds a bit sad... because both parent and son are cook for someone to eat... Oh no, I am getting too emotional... haha... Despite of this, I still love to eat this :P


   Oyakodon   
{ via Recipe of Japanese Cooking, p. 101 }
serves 2 | prep 5 mins | cook 10 mins | Japanese 
[ Ingredient ]


Ingredient A

100 g chicken thighs
1/2 onion
3 eggs
4 or 5 stalks trefoil (I did not use this)
2 bowls of rice

Ingredient B

4 1/3 tbsp chicken stock
2 tbsp sake
2 tbsp sugar
2 tbsp mirin
2 1/2 tbsp soy sauce

[ Method ]

1 Remove excess fat and skin from the chicken thighs, and shave into bite-sized pieces. Peel the onion, and slice thinly. Cut the trefoil stalks into 2-3 cm long. Beat the eggs lightly.

2 Add ingredient B a bowl and mix well.

3 Put the hot rice into individual bowls.

4 Put only a half of the liquid prepared in step 2 in a frying pan, and bring to the boil. Add half of the chicken thigh pieces and onion slices, and simmer.

5 Pour a half amount of the eggs gently along the circular edge of the simmering sauce, and cover. Simmer for about 30 seconds while shaking the pan gently. Scatter half of the trefoil stalks, and turn off the heat. Put everything onto the rice in one of the bowls. Repeat step 4 and 5 for the other portion.


[ Kitchen Notes ]

¶ If you think it is too trouble to cook the chicken one by one, you can put the chicken in a big ban and pour all the ingredients and follow the recipe. I did it like that cause I think it's too time consuming... After all, I think I am really lazy... hehe

¶ Normally, oyakodon gives a lot of moist and sauce, I guess I cooked too long... haha.. Because I didn't follow the recipe... um...

  bon appétit  :) 

{ Recipe } Butter Chicken


Indian! Yes, I have been craving for Indian food for a while! And again, Julie Goodwin made me cook her recipe... haha! This is a very simple and easy recipe. How could I not cooking this while I was craving for Indian food? It may not be as authentic as the one you might taste in the Indian restaurant, but the flavour and  the look are definitely there. This recipe is certainly a winner for a quick fix weeknight dinner.


   Butter Chicken   
serves 6 | prep 15 mins | cook 20 mins | Indian

[ Ingredient ]

2 tbsp olive oil
50 g butter
1.6 kg chicken thighs, trimmed and cut into thirds (I boned and cut all skins and fat)
2 tbsp fresh ginger, grated
2 cloves garlic, finely chopped
3 tsp ground coriander seed
3 tsp ground cumin
1 tsp ground cardamon
1/2 tsp ground allspice
1/2 tsp chilli powder
4 tbsp tomato paste
1 1/2 cups tomato puree
2/3 cup natural yogurt
1 cup thickened cream
Salt
Coriander leaves and extra yogurt

[ Method ]

Note: the below is for reference only, for a proper full version of the recipe, please click here and click photo to enlarge.


[ Kitchen Notes]

¶ I forgot to buy the yogurt, so I am not sure does it affect the flavour of the whole dish.

¶ After I cooked the chicken in the pan, I also cooked them in the pressure cooker for about 15 mins. However, I think the chicken were too soft after they cooked in there... haha... So I think next time, it's either cook in the pan or straightly put in to the pressure cooker. That way the chicken will not be too soft.

¶ Click here to know more about Butter Chicken.

 bon appétit  :)