now i know

Now i Know >> How to wrap dumplings

April 30, 2013 Unknown 0 Comments


I never know there are so many ways to wrap dumplings. However, the one I usually use is not here, but it is quite close to the last one from above. So, I guess there are at least 8 ways to wrap this little yummy things.

[ source: Pinterest ]

  bon appétit  :)

0 comments:

edible garden

HomeGrown: Cucumber

April 27, 2013 Unknown 0 Comments


I always want to grow some veggies and herbs in our garden, as I love to cook with fresh fruits and vegetables. However, one thing stops me from getting started... which I just thought I might not have the patient and consistency to watering the plants.

Early February, Mr. Pear and I bought some seeds from Bunnings. I remembered after we planted the cucumber seeds the next day we got the pouring rain which caused many places in Brissy under water. Our backyard has the history of water overthrowing... Of course, there was no exception for this time. So, both Mr. Pear and I were like... the seeds must have died as they were soaked in the water for such a long time. Amazingly, few weeks later, we started to see the cucumber seeds were blooming everywhere (thanks to the rain and the little flood that washed the seeds everywhere =__=). Since then, I am so excited about it and I started to take more care to help it grow better.

The cucumber plants do have a lot of flowers, but not every flower can bear fruit. So far, I can only see three to four are developing to become cucumbers :D It is very interesting to see it to develop from flower to cucumber. If I have not grown it, I would never know the cucumber actually develop from the end of the flower, unlike tomato which the fruit develop in the flower.


Hope we can have more cucumbers soon, as I can't wait to make the cucumber salad with this homegrown little gorgeous! :D

  bon appétit  :)

0 comments:

desserts,

{ Recipe } Apple Tarte Tatin

April 15, 2013 Unknown 0 Comments


Do you still remember the Easter dinner that I mentioned before? On that day, I made crème caramels for dessert. Since I was not sure how crème caramels will turn out, I made this dish for my backup plan.  I was so stressed on the day. I was so worried what if crème caramels did not turn how it should look and how it should taste... then I failed my guest... Though I had this backup plan, making two desserts was actually killing me. However, I was so glad that I made two desserts, as they both turn out really good and my guests loved them! I was over the moon! :))))

There was a little hiccup when I made this apple tarte tatin. I burnt the sugar!! Oh, no!!! What an unforgivable mistake! Before the guests came, I was trying to multitask myself... cooking, cleaning, doing laundry, blah blah blah... I kinda overestimated my efficiency! I put the sugar in the pan and left the kitchen and try to do something else which I should not do. I should watch the sugar closely because it is the most important part of the whole dish! And that is how it got burnt...

Again, as I was too busy with cooking for the night, I kinda forget to take pictures :((( And I almost forgot to take this finished product... as you can see, there is only a small on the plate... hopeless!! X_X


   Apple Tarte Tatin   
serves 2 | prep 10 mins | cook 30 mins | French 

[ Ingredients ]

3 golden delicious apple
1 tbs lemon juice
1/2 cup (110 g) caster sugar
20 g unsalted butter, chopped
ready-rolled puff pastry sheet
cream, to serve

[ Method ]

1 Preheat oven to 220°C (200°C  fan-forced).

2 Peel apples, cut into quarters, remove cores (cutting each quarter at the core so it has a "flat" side), and toss the quarters in a large bowl with the lemon juice and 1 tbsp of sugar.

3 Using 20 cm frying pan as a guide, cut pastry into a round slightly larger than the pan, prick with a fork.

4 Melt butter in a 20 cm non-stick frying pan over medium-hight heat. Cover with the remaining sugar. Cook over medium-low heat, shaking pan occasionaly to spread around any dark spots that appear, until a rich caramel forms.

5 Place apple quarters into pan, rounded side down, arranging them around pan. Cut remining apple to fill gaps. Cook the apples over medium heat for about 10 mins until caramel is bubbling up in the pan, shaking pan occasionally to prevent burnt spots

6 Lay the pastry over the apples, tucking any protruding edges around edges of pan

7 Place the pan in the oven, cook for about 25 mins, or until the puff pastry has risen and cooked. The pastry should be dry and flaky. Stand tarte in pan for 10 mins before carefully turning out onto a serving plate. Serve with cream. 

[ Kitchen Notes ]

¶ The main pressure point of this recipe is to caramelise the sugar. Other than that, this is actually not a difficult dish to cook at all :D

  bon appétit  :)

0 comments:

eating out

Place2Eat: Urbane

April 13, 2013 Unknown 0 Comments


This restaurant consists of four different sections (Urbane, Sub Urbane, The Euro and The Laneway) under the umbrella of Urbane Group. These four different sections have their own menu and characteristics. Tonight, we were dining in Sub Urbane for a private function, to be exact a wedding dinner. The ambiance is classy and romantic. Sub Urbane is a tiny little room for a small size function but has a great privacy. The service was excellent and the food was fantastic! Plus sharing the meal with people you love, tonight was absolutely an awesome night!

We were first serve with the complimentary warm homemade bread which was really soft and we ordered more when we had our main... :D


Then we were served with the entree. I personally like the scallops better, not because it is seafood, but did cook really well and taste really fresh.
{ entree 


After the entree, we were surprised by the newly wed couple by a speech from every guest! Seriously? I think it was not a good plan, especially for a person does not really like public speech, like me... (even though I am a well-known talkative person...) Anyway, all of us were starving by the time everyone finished their speech. So, we just can't wait any longer to start digging into our main :D

{ mains }


{ sides }


The portion of the dish did not look very big, together with the sides that we had, it was actually quite filling. We order extra three bowls of chips! Can't you tell we LOVE chips? :P The beef was done perfectly according to Mr Pear (I did try a bit, it was really yum!). One of my friends, Agnes, said it was even better than Moo Moo! Erm... I think they both have their own specialty and it is really hard to say... right? I, myself, quite liked my piece of fish :D Simple, but nice!

Here comes the desserts! To be honest, we were from starving to super full in just one course. I wish I have two stomach so I can accommodate the good things of both world... But the fact is, I only have one stomach and I knew it was super duper full... BUT, how can someone say "NO" to dessert? 

{ desserts }


Oh, no!!! I finished them!!! They were so delicious!! A bit too sweet though... but still good!! hehe... These really made us the happy pear (pair) ;P


   Urbane   
181 Mary Street, Brisbane QLD 4000
07-3229 2271
www.urbanerestaurant.com

++  Rate & Review  ++

  bon appétit  :)

0 comments:

mains,

{ Recipe } Taiwanese Beef Noodle Soup

April 07, 2013 Unknown 0 Comments


Oh, Pinterest, Pinterest! I don't know how I can live without you. You are so awesome and you are so addictive!! Sometimes, I can spend the whole night just browsing Pinterest. This site has all I want to see, fashion, design, craft, photography, recipes.... countless! I discovered this recipe via Pinterest the other day. Since I have not found a job yet and I think I should be a good wife and cook more for my Mr. Pear :D, I decided to make this tonight.

Taiwanese beef noodle soup best comfort food for winter time and I am so glad that we bought the pressure cooker from Aldi (though not a fancy one, it does its job quite well!). If you follow the original recipe by using the slow cooker, it will take you about 6 hours. Whereas using the pressure cooker, your dinner will be ready in less than an hour! Both cookers are amazing, but I just find pressure cooker is more convenient. :D


   Taiwanese Beef Noodle Soup   
serves 4 | prep 10 mins | cook 40 mins | Taiwanese

[ Ingredients ]

600 g beef stew meat
4 cups water
1/4 cup dark soy sauce
1/4 cup light soy sauce
1/2 cup Chinese rice wine
1/8 cup rock sugar 冰糖
3 slices fresh ginger
2 stalks green onion, sliced
3 garlic cloves, minced
2 red hot chili, seeded
1 tbps all spice powder
1 cup chicken broth
1 pack Yang-chun noodles 陽春麵 (any dried Chinese noodles will do)

[ Method ]

The below is for reference only, for a proper full version of the recipe, please click here and to enlarge the image, please click the photo.


[ Kitchen Notes ]

¶ It is important to wash the noodles under running cold water, as it helps to prevent the noodles stick together and to prevent the noodles being overcooked with the heat of the noodles.

¶ As this dish does not have any veggie, so Mr. Pear made his homemade pickled veggie to make this dish more nutrient. What a thoughtful man!! :DD

  bon appétit  :)

0 comments:

desserts,

{ Recipe } Chuanbei and Egg Sweet Soup 川貝雞蛋甜湯

April 03, 2013 Unknown 0 Comments


I was talking with mum the other day and my voice was really bad and I knew I just can't lie to her that I was  feeling fantastic... I have been coughing, sneezing and having a runny nose since Easter... I coughed until like my lungs were coming out from my chest. Worst cough ever!!! I am glad that I called mum that day... She taught me to cook this soup and it helps to soothe the bad cough. She told me dad drank that one time and he got so much better. So I took mum's advice and cook this soup. It was fun to have an interesting conversation with mum when she tried to teach me how to cook it.

Mum: here are the ingredients: 3 eggs.
Me: So 3 hard boiled eggs or raw eggs with shell?
Mum: Just 3 raw eggs. Then, 3 dried whole citrus peels. 
Me: So am I cook the raw eggs together with other ingredients?
Mum: Yes... and 8 dried honey dates... (mum started to get annoyed) 
Me: What? 8 dried honey dates? Would it be too sweet? How much water you are putting in?
Mum: Can you just let me finish before you ask questions? I don't even finish the recipe! You keep asking questions, how am I supposed to finish telling you the recipe? So can continue?
Me: Okay! 

Then, we both burst out laughing... Yes, that's me... Sometimes, I can be quite annoying... haha... So blessed that Mr. Pear can bear with all my nonsense... = , =|||

Anyway, mum finally finished the recipe after she lost her temper to me... So I did learnt this recipe a hard way! hehe... I made this the other night and I forced Mr. Pear to drink with me together as he started to have some cough... and Mr. Pear said he loves it! 

Though this soup quite worked for me (at least I did not have the chest pain when I coughed), the effectiveness is varied from different individuals.

   Chuanbei and Egg Sweet Soup   
{ mum's recipe }
serves 2 | prep 5 mins | cooking 1 hour | Chinese

[ Ingredients ]


3 eggs
3 dried whole citrus peels 原塊果皮
8 dried honey dates 蜜棗
15 g dried south almond 南杏
15 g dried north almond 北杏
20 g chuanbei 川貝


[ Method ]

1 Put all ingredients in a medium pot (except the chuanbei) and cover with 6 bowls of water under medium high heat until the eggs are cooked. Meanwhile, put the chuanbei in a small processor and blend it into small pieces.

step 1a: put everything in the pot (except the chuanbei)
step 1b: process the chuanbei into small pieces

2 Take out the eggs and peel the shell off. After that put the peeled eggs and the blended chuanbei in the pot and cook together with other ingredients under medium high heat. When the water reduced to 2 bowls of water, then you are done. Simple! :D

[ Kitchen Notes ] 

¶ Mum said to blend the chuanbei into smaller pieces can help to release the taste from chuanbei quicker.
¶ Remember to wash your eggs before cooking. 


  bon appétit  :)

0 comments:

desserts

{ Recipe } Crème Caramel

April 01, 2013 Unknown 0 Comments


We did not have plan to go away during this Easter. Instead, we were just relaxing at home and invited some friends to come over and had a barbecue. I have made this before and this was actually the second time I made this (I normally cook most of the recipes once, unless it is very easy and/ or very delicious).

I was a bit worry about the time is not enough for the egg mixture to set, but I guess my worry was not necessary. The crème caramels (焦糖布丁) turned just nice and was a crowd pleaser for the night. :D The egg custard was really smooth. It tastes like the Chinese version of steamed sweet egg (燉蛋) but with the caramel on top. Yummy!

   Crème Caramel   
{ via Australian Good Taste - April 2008, p. 92 }
serves 6 | prep 30 mins (+2 hrs cooling) | cooking 55 mins | French 

[ Ingredients ]

vegetable oil, to grease
60 ml water
215 g caster sugar
750 ml milk
4 eggs
1 tsp vanilla extract
pouring cream (optional), to serve
fresh or frozen raspberries (optional), to serve

[ Method ]

1 Preheat oven to 160°C. Line the base of a roasting pan with a tea towel, folded to fit. Lightly brush six 185 ml capacity ovenproof ramekins with oil to grease. Place in the pan on the tea towel.


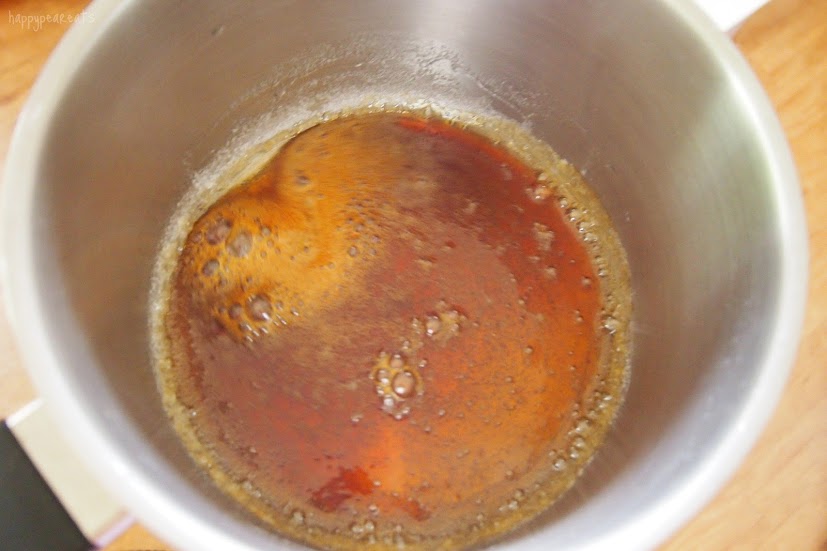
2 Place the water and 155 g sugar in a small saucepan over low heat (see kitchen notes for this step). Cook for 5 mins or until sugar dissolves. Increase heat to high and bring to boil. Reduce heat to medium and cook, without stirring, for 8 mins or until golden. Allow the bubbles to subside then pour the mixture evenly among the ramekins. Swirl to coat the base and about 2 cm up the sides of the ramekins. Set aside to set.

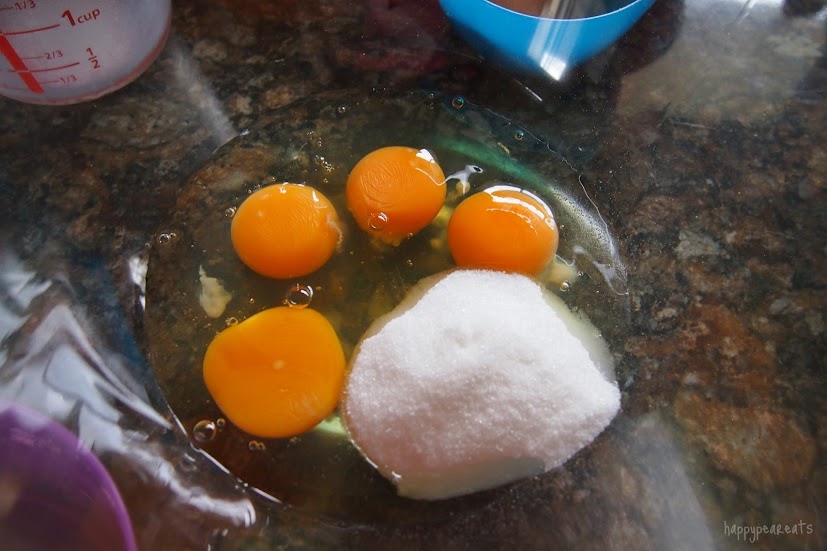
3 Place the milk in a medium saucepan over low heat and bring just to boil. Remove from heat. Whisk together the eggs and remaining sugar in a large heatproof bowl. Slowly add the hot milk (see kitchen notes for this step), whisking constantly until well combined. Stir in the vanilla. Strain through a fine sieve into a large jug.

4 Pour the milk mixture evenly among the ramekins. Pour enough boiling water into the roasting pan to reach halfway up the sides of the ramekins. Bake for 40 mins or until custards are just set. Remove ramekins from pan and set aside for 2 hours to cool. Cover with plastic wrap. place in fridge overnight to chill.


5 To serve, run a flat-bladed knife around the inside edge of each ramekin and carefully invert the crème caramel onto serving plates. Serve with cream and raspberries, if desired.


[ Kitchen Notes ]

¶ With step 2, keep an eye on the colour of the sugar mixture to avoid burning. It should be a warm golden colour and not too dark. You must be very patient with this step, otherwise, the sugar will burn easily.

¶ With step 3, make sure you pour the milk slowly and whisk constantly so as to avoid the hot milk cooks the egg mixture.

¶ Straining through the fine sieve for the egg mixture in step 3 is a key to have a silky smooth egg custard.

¶ Click here to get to know more about this dessert.

  bon appétit  :)

0 comments: