biscuits n cookies,

Happy New Year everyone!!! How was your new year eve like? Mine was a quiet and relaxing one with Mr. Pear. He prepared a beautiful dinner and we shared a glass of champagne. It was wonderful :D
I am sorry for the lack of post for such a long time. I was meant to post this before Christmas. However, my computer was playing up, so I needed to get Mr. Pear to fix it... and now it is up and running again! Yay!
Not long ago Two months ago, my dear friend Jade referred her friend to me as her friend wanted to have some macarons for her wedding. To be honest, I was really happy on one hand, coz someone trusted me and recommended me to their friends. How cool is that~
{ Recipe } Plain Macaron Shell (Italian Meringue)

Happy New Year everyone!!! How was your new year eve like? Mine was a quiet and relaxing one with Mr. Pear. He prepared a beautiful dinner and we shared a glass of champagne. It was wonderful :D
I am sorry for the lack of post for such a long time. I was meant to post this before Christmas. However, my computer was playing up, so I needed to get Mr. Pear to fix it... and now it is up and running again! Yay!
But on the other hand, I was a bit freaking out, as I haven't baked macs since 2010 after Jade's wedding. A good three year without making any, and now I have to bake for someone's wedding again?! How can I not freak out?!
So, the macaron madness begins...
I know I may shock you a bit if I tell you I am actually not a macaron fan but what makes me so fascinated about macaron is the unlimited combinations you can have with the shell flavours and the fillings.
I know I may shock you a bit if I tell you I am actually not a macaron fan but what makes me so fascinated about macaron is the unlimited combinations you can have with the shell flavours and the fillings.
If you follow my facebook page, you sure know how often I bake macs for the past few a couple of weeks. It has been an ups-and-downs journey. And it was so good to see the macs getting beta each time.
Of cause, every now and then accident happened, especially when trying new stuff.... haha...Yes, please do not expect to get it right at the first time. This recipe is a guide line for you to practise and the key steps are mostly followed from Adriano Zumbo's book, Zumbo with a little modification according to my personal experience and preference. However, please be aware that the outcome may vary due to different circumstances which will also be shown as we go through the process. It is gonna be a long post, but it records all I have come across these few weeks, so you know what to expect and what may happen :)
Once you have got the idea of how to make it and it is just a matter of time before you nailed it :) So, "Never Give Up" is the first and the main ingredient that you must have.
So, are you ready?
{ adapted & modified via Zumbo by Adriano Zumbo, p. 16 }

[ Ingredients ]
300 g almond meal
250 g pure icing sugar (original: 300 g)
110 g egg whites, at room temperature
250 g caster sugar (original: 300 g)
75 g water
Food colouring, if required
110 g extra egg whites, at room temperature
(original recipe also include 2 g egg white powder, however, it turned out well without it for my macs, so it is up to you. The function of egg white powder is to stable the meringue.)
[ Equipment ]
sieve
couples of dry and clean bowls / containers (prefer non plastic)
2 large mixing bowls
stand mixer or hand held mixer (prefer stand mixer)
digital thermometer
oven thermometer
baking paper
piping bag
#12 plain nozzle (the round one)
4 baking trays / baking sheets
small saucepan
spatula
measuring spoon
digital scale
[ Preparation ]
# Drawing pattern on baking paper for easy piping (optional)

The size of the macs is up to you. According to Zumbo by Adriano Zumbo, he makes his macarons 4 cm diameter rounds. As for me, I use an Australian 50 cents coin to trace my mac size. It's about 3 cm diameter.
Draw the circle on the baking paper according to the size of your baking tray (it is better if you have a baking sheet). Depends on how many trays you have, as for me, four sets of the pattern are needed.
Make sure there are about 2-3 cm gap between each macs. To help the heat goes through the macs evenly, draw the circle in between the gap for each line like this:
O O O O O O O
O O O O O O O
O O O O O O O
O O O O O O O
# Egg white separation
I use about 3 x 58 g eggs (large egg), it will yield about 110 g egg whites and you will need two sets of 110g egg whites. Put them in different containers.
So, are you ready?
Plain Macaron Shell
makes 100 shells | prep 1 hr + drying time | cook 16 mins | French

[ Ingredients ]
300 g almond meal
250 g pure icing sugar (original: 300 g)
110 g egg whites, at room temperature
250 g caster sugar (original: 300 g)
75 g water
Food colouring, if required
110 g extra egg whites, at room temperature
(original recipe also include 2 g egg white powder, however, it turned out well without it for my macs, so it is up to you. The function of egg white powder is to stable the meringue.)
[ Equipment ]
sieve
couples of dry and clean bowls / containers (prefer non plastic)
2 large mixing bowls
stand mixer or hand held mixer (prefer stand mixer)
digital thermometer
oven thermometer
baking paper
piping bag
#12 plain nozzle (the round one)
4 baking trays / baking sheets
small saucepan
spatula
measuring spoon
digital scale
[ Preparation ]
# Drawing pattern on baking paper for easy piping (optional)
The size of the macs is up to you. According to Zumbo by Adriano Zumbo, he makes his macarons 4 cm diameter rounds. As for me, I use an Australian 50 cents coin to trace my mac size. It's about 3 cm diameter.
Draw the circle on the baking paper according to the size of your baking tray (it is better if you have a baking sheet). Depends on how many trays you have, as for me, four sets of the pattern are needed.
Make sure there are about 2-3 cm gap between each macs. To help the heat goes through the macs evenly, draw the circle in between the gap for each line like this:
O O O O O O O
O O O O O O
O O O O O O O
O O O O O O
O O O O O O
Not like this:
O O O O O O O
O O O O O O O
O O O O O O O
O O O O O O O
After drawing the pattern, grease 4 large baking trays/ sheets and line with the pattern baking paper (draw side up or down doesn't matter, as long as you can trace the circle) and place another non-stick baking paper on top of it. Using two baking paper can help to prevent the bottom of the macs shell from getting overcooked. Some suggest to use two trays, one inside the other for the same reason.
point >>
- If you are not good at piping like me, you can draw the circle on baking paper to help you trace later when you do the piping. I find it is very helpful especially you want to have your macs with the same size :)
- I like a smaller size due to the sweetness of the biscuit. Plus, I think it is easier to consume especially in a special occasion like a wedding. It doesn't look good if it goes everywhere... (. __ .|||)
# Egg white separation
I use about 3 x 58 g eggs (large egg), it will yield about 110 g egg whites and you will need two sets of 110g egg whites. Put them in different containers.
Separate the eggs one by one and in different container. Just in case, you have a bad egg or break the egg yolks, then you don't have to throw all your good egg whites away.
Bring out the egg whites (if you age the egg whites) or separating the egg whites from the fridge when you start to measure your ingredients, by the time you are ready to whip the egg whites, it should be at room temperature.
point >>
Bring out the egg whites (if you age the egg whites) or separating the egg whites from the fridge when you start to measure your ingredients, by the time you are ready to whip the egg whites, it should be at room temperature.
point >>
- You need to make sure all your containers are clean and dry before you store the egg white.
- Discard any egg white that may have any yolk or water in it during the separation.
- You can age your egg whites a day or few days before you make the macs. Cover the egg whites with a paper towel instead of cling wrap and place it in the fridge. The paper towel helps absorbing the moisture from the egg whites. I do not age my egg whites and it works well, so it is optional if you don't want to do that.
# Preparation of tant pour tant (TPT)


Processed 250 g icing sugar in the food processor until it becomes a fine powder. Then, add in 300 g almond meal and process until just combined. Do not over process.
Use a large spoon to push the powder mixture through a fine sieve into a large mixing bowl and set aside. I usually sift once, but you can sift twice maximum. Sift too many times will result in oily mixture.
Then put the powder mixture in the oven and set at 45°C. This help to keep away the moisture contain in the powder, especially in rainy or humid day.
point >>
If you have got all your preparation done, let's get start.
Processed 250 g icing sugar in the food processor until it becomes a fine powder. Then, add in 300 g almond meal and process until just combined. Do not over process.
Use a large spoon to push the powder mixture through a fine sieve into a large mixing bowl and set aside. I usually sift once, but you can sift twice maximum. Sift too many times will result in oily mixture.
Then put the powder mixture in the oven and set at 45°C. This help to keep away the moisture contain in the powder, especially in rainy or humid day.
point >>
- The measurement that I used is not quite TPT. Tant pour tant refers to an equal amount of almond meal and icing sugar. However, the amount of sugar to make the macs really scares me. I decided to cut down the sugar by 50 g for both icing sugar and caster sugar and it works.
- You can grind your own almond meal, but I choose to buy from store, simply because of convenience. I can't give more information about grinding almond as I haven't done it before. All I know is that you can't grind the almond too long which will make the almond meal too oily to use and will affect the result.
# Preparation the ingredients for Italian meringue
Measure 250 g caster sugar and 75 g water in separate containers and set aside.
If you are going to use colouring, you can add the colouring directly in the water, as long as the total weight of the water plus the colouring is between 75 g to 80 g, that should be fine.
point >>
- If you want to make your macs in a dark colour, you may need to put more colouring as the colour will become lighter after you add into the meringue and will become even lighter after baking. Getting the right colour really comes down to practise. The brand of the colouring also vary, so it is hard to tell you how much you should put.
- You must add the colour as you are making the syrup, because if you add it to the mac mixture itself it will change the mixture's consistency. Because of this, you need to get the colour right before your mix the syrup to the egg white later.
[ Method ]
If you have got all your preparation done, let's get start.
1 Put one set of the egg whites in a stand mixer with a whisk attachment (if don't have one, put it in a large mixing bowl and prepare the hand held mixer).


Place the sugar and water in a small saucepan over low heat and stir until the sugar has dissolved.


point >>
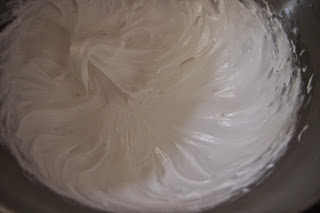
2 When the sugar syrup reaches 118°C, increase the mixer speed to high and slowly add the sugar syrup in a steady stream down the side of the bowl. Whisk until warm to touch the mixing bowl, it takes about 8 minutes. The meringue should be stiff, firm and has a glossy texture.


point >>
3 Take out the almond meal and icing sugar mixture from the oven , add the other set of egg whites to the mixture and combine it until a paste form. If you are making flavoured shells, you may add the flavouring in this step.


Then, add one third of the meringue and use a large spatula to fold them through until combined. After that, add another one third to the mixture fold through again until combined. Pour the meringue batter back to the meringue bowl and fold through. As you fold through the mixture, it will begin to loosen.


When the mixture falls slowly off the spatula and forms a ribbon and the ribbon slowly disappear/ incorporate back into the batter within 15-20 seconds, then the batter is ready.


point >>
4 Transfer the mixture to a piping bag with a #12 plain nozzle. Holding the piping bag about 1.5 cm above a tray, pipe straight down onto the tray with the traced pattern and pipe just touch the line. As you finish piping each mac, move the nozzle from 12 o'clock to 6 o'clock quickly to finish the piping action. If you have the correct texture, the mac will soften again slightly and the tip on top of the mac will drop, leaving a smooth top. Some mac are dusted, using a fine sieve, or sprinkled with a flavour at this stage.


5 Tap the bottom of the tray lightly for few time and leave the mac at room temperature for 30 minutes or until a skin form or touch without any batter stick to your finger. After a 10 minutes of drying process, preheat oven to 130°C.


point >>
[ Kitchen Notes ]
Place the sugar and water in a small saucepan over low heat and stir until the sugar has dissolved.
Use a clean pastry brush to brush down the side of the pan to avoid any crystallisation. Increase the heat and bring to boil. Cook until the mixture reaches at around 110°C, start whisking the egg whites on medium speed until frothy.
- you need to be very patient in this step, too much heat will burn the syrup. Use a digital thermometer or a candy thermometer to keep track with the temperature.
- It is ok for the sugar syrup reaches 118-120°C.
- You can test the stiffness of the egg white by placing the bowl up side down, the egg white should not fall if the texture is right.
- It is not very hard to tell if the egg white are ready, when you start to increase the speed, the egg white looks very foamy. When you finish adding the sugar syrup, the egg white looks more solid and it is very glossy. If you are near to this stage, you need to watch it closely and don't over beat the egg white.
Then, add one third of the meringue and use a large spatula to fold them through until combined. After that, add another one third to the mixture fold through again until combined. Pour the meringue batter back to the meringue bowl and fold through. As you fold through the mixture, it will begin to loosen.
left: the first 1/3 of the meringue, you can see the almond mixture is more grainy.
right: the second 1/3 is added. The batter is formed and the mixture is loosen a bit.
When the mixture falls slowly off the spatula and forms a ribbon and the ribbon slowly disappear/ incorporate back into the batter within 15-20 seconds, then the batter is ready.
left: you see the ribbon mark on the batter.
right: after 15-20 seconds the ribbon will sink back to the batter and become smooth.
- Make sure you are folding through from the bottom to the top, not stirring.
- Remember under fold is always better than over fold. When the batter is almost done, you need to keep checking the texture.
- Under fold the batter will have a rough and non-smooth surface.
- Over fold... I haven't experienced before. But I have found some possible effects with over fold batter. Over folding will lead to a runny batter which contributes to the footless of the macs. Also the macs cannot hold its shape.
4 Transfer the mixture to a piping bag with a #12 plain nozzle. Holding the piping bag about 1.5 cm above a tray, pipe straight down onto the tray with the traced pattern and pipe just touch the line. As you finish piping each mac, move the nozzle from 12 o'clock to 6 o'clock quickly to finish the piping action. If you have the correct texture, the mac will soften again slightly and the tip on top of the mac will drop, leaving a smooth top. Some mac are dusted, using a fine sieve, or sprinkled with a flavour at this stage.
left: there is a little "nipple" after you piped the batter, this is normal.
Otherwise, your batter is too runny.
right: if the texture is right, the "nipple" will disappear and will leave a smooth top.
left: the shells look very shinny after piping. if you touch the top, it will stick to your finger.
right: if the shells are dried, it looks dull and when you touch it, nothing will stick on your finger and it is ready to put in the oven :D
point >>
- Instead of leaving the mac room temperature, some suggest to put it in the oven about 40-45°C for 20 mins then straight away increase the temperature to 130°C. I have tried this and it works, so on a humid day, this is a very good method to use, as it takes longer to form the skin.
- Tapping the bottom of the tray can help to get rid of the air in the shell. Do not worry if your texture is right, the hole from the bursted bubble will disappear.
- The skin is important as it lifts while the mac cooks. creating a "foot" at the base.
- However, do not over dry the shell, this might crack the shell as you bake.
6 Bake the macs for 16 minutes, until they have a firm outer shell. Remove from the oven and set aside for 2 minutes, then carefully remove one mac with a spatula to check that the base is also cooked and dry. If it is still slightly sticky, return the macs to the oven for 2-3 minutes, then check again. Cool the macs completely on the tray.


left: after a few minutes, the feet will start to form.
right: the macaron is cooked if the base is dry. (this is an orange macaron, you didn't have problem with your eyes :P)
point>>
- Place the tray in the middle rack. If you have more than two trays, better to put in the middle and lower rack rather than middle and higher. As most of the heat will go to the top, and it will overcook the outside of the side quickly. Swap the trays half way if you bake two trays at one time, it helps to distribute the heat evenly as a result the colour of your shells will be more uniform.
- The "food" should appear in the first 5 minutes.
- Make sure you use your oven thermometer to get the right temperature.
[ Kitchen Notes ]
- Being patient is one of the key to success.
- I will try to make the french meringue next time, as it seems easier and less trouble. Stay tuned~
♥ bon appétit :)

0 comments: